

I'm a visual learner. Studies show that a large majority of us do learn by seeing. When I started this blog, it was my intent to let my shots speak a thousand words. So, when I create a tutorial, I try to show each step with pictures instead of words so you can just scan through the pictures to find out what to do. With that process, I may use a dozen or so pictures in one post. I like to credit my pictures with a watermark. That can be a slow process if you watermark the pictures one by one.
A couple of weeks ago, 2 people in one week said they didn't know how to watermark their pictures. I usually refer folks to the website where I learned about mass watermarking, but it's not there anymore.
So here is my tutorial for watermarking pictures all at one time.
******************************
1. Download the free program Photoscape if you don't already have it.
2. Open the program and choose Batch Editor.


4. The first time you watermark with Photoscape, you will need to make your "object" or what your watermark will say. For the rest of the time, it will always be there and you don't have to create it again. When you don't want it to appear, you will uncheck the box. So to create the "object" you will......


Be sure to click 'ok' when done.
5. Check the location of the watermark on each picture.

6. Sometimes the watermark is in a nonsuitable place just for 1 or 2 pictures. In that case, choose the Convert Current Photo button then delete the pictures from the group you are watermarking so they won't be watermark when you convert all of them.
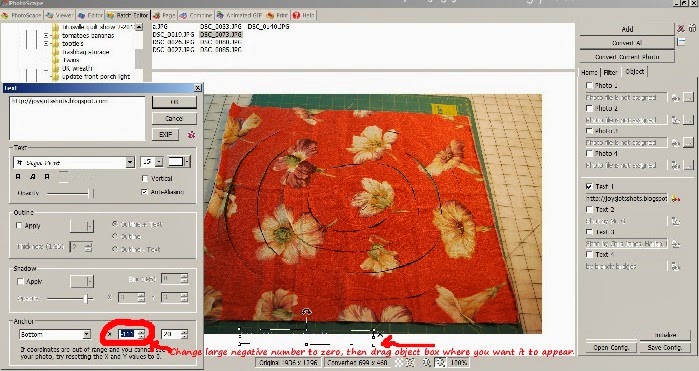
7. Sometimes you lose the 'Object'. It doesn't appear on the picture anywhere. To find it, click on the pencil icon and you will probably find one of the numbers at the bottom of the pop up window to be a large negative number. Change it to zero then look for at least part of the 'object' box to appear. Drag it where you want it to appear.
 The newly watermarked pictures will be reproduced and placed in a defaulted new folder named "Output." This new folder is found inside the folder of the pictures you are changing.
While I'm watermarking with Photoscape, I also change the size of my photos because at one time, Blogger said I reach my storage limit. It told me that all pictures under 800 were not counted, so I change the size to 799. For more information about changing size of pictures, please go to my Downsizing Tutorial. This requirement may have changed as I've been told by someone they have uploaded a large number of large size pictures and Picasa doesn't show them using up much space at all. Regardless, I have become comfortable with the 699 size on my blog, so since it's effortless to change the size while I watermark, I do so.
For those of you that needed info on watermarking, I hope you find this post useful.
*************************
Sharing at several Linky Parties.
Thanks to the FREE programs:
possibly used for this post
GIMP for cropping & other digital effects
Photoscape for downsizing & watermarking photo
PicMonkey creating collages used on this page
Thanks for sharing @ Monday Handmade linkup party. Have a great week. :)
ReplyDeleteWow, great post. You make is sound really simple. Thanks for sharing this free program. :)
ReplyDeleteGreat tips! Thank you so much for sharing this!
ReplyDeleteI used to watermark all my pictures and for some reason I stopped. I guess it just got to be too much of a pain in the butt. This is a very good tutorial though
ReplyDeleteawesome tutorial. Thanks for sharing. I love this program but still have lots to learn.
ReplyDeleteI've been watermarking my photos one by one using ribbet.com, but as you say, it can be time-consuming. Thanks for the tip. Will definitely be checking this out.
ReplyDeleteThanks for the tutorial!
ReplyDeleteGreat tutorial, thanks for sharing. I am going to Pin it to my tutorial board where others will see it too. ~Diane
ReplyDeletethis is awesome, and thank you for the PICTURES!
ReplyDeleteHey, Judy, this is very useful! And a reminder to be efficient with our time! Thanks for the link-up! See you again tomorrow, I hope. ~ Rose
ReplyDeleteA great tutorial, Joy. I still reduce the size of my photos, too.
ReplyDelete