...well, that's what I call it. This was the BiG project I worked on for about 3 months to give as Christmas gifts. I went through lots of trial an error. I had experimented a bit last year. I immediately was interested because it combined 3 things I really enjoy doing: computers, photography and sewing.


1. Open picture in GIMP
2. Crop picture if need
3. Color, desaturate, average, ok (gets
rid of colors)
4. Filters, edge-detect, difference of
gaussians (might want to tweak smoothing parameters)


I lowered the feed dogs, used the free motion foot & didn't change other settings. Please note, this can be done on ANY (which is just about all) machine that will let you drop or cover the the feed dogs because you do the work, not the machine. Ellisimo can do a lot of fancy things, but it can't do this by itself. (Authors note: 2-8-2012- Some have thought you have to have an embroidery machine to do this. You do NOT. That means, this can be done with a regular sewing machine, with feed dogs dropped or covered & using no foot on your machine. Just remember to drop the foot to stitch.)


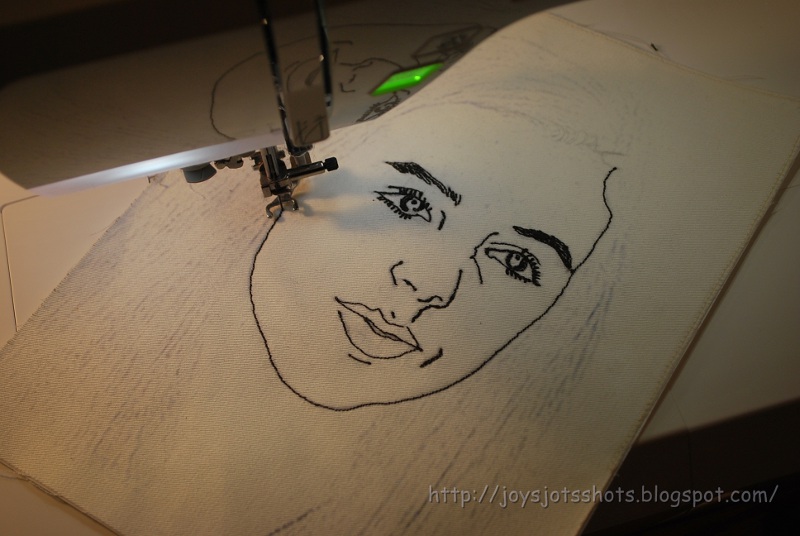
Lowered the pressure foot, held the sides of the canvas to move the canvas and started free motion stitching over the lines. The tricky part with this art..there is no way to shade lighter. You can add more lines of thread to make darker. I'm sure some practice can help this problem.

My first results:
Things I learned:
I thought the first picture needed more lines. Second picture is ok, it is one way to show shadows. The last picture I tried to show teeth and just wasn't successful at all.
I also decided to use less lines for facial features. So I looked for more pictures, especially those without "teeth" smiles.
I also decided to make the drawings using continuous lines, rather than choppy short lines.
This post was featured @


I can sometimes be found at one of these parties:


WOW! Those are amazing! I love it! :)
ReplyDeleteI love this! Thank you for sharing.
ReplyDeleteI don't own such a marvellous sewing machine, nor do I have that photo software. You've set me wondering if there was some other way to reduce a photo down to lines like you have... then perhaps one could embroider it by hand. Hmmm...
Please note Maija, the software is a free download. Please find it @ http://www.gimp.org/ & any sewing machine that will let you drop or cover the feed dogs will let you do free motion sewing. It's all by hand. The sewing machine doesn't do the fancy work.
ReplyDeleteI've found using grey thread rather than black helps "shading" as then where you go over a line again it looks darker.
ReplyDeleteThat's such a great job! Congratulations.
ReplyDeleteOh wow, never seen this before now, its awesome, looks hard to do!!
ReplyDeletePaula
Thank you so much for sharing! This is absolutely amazing.
ReplyDeletemadebyniki.blogspot.com
So cool!
ReplyDeleteYou took it to a whole nother level - very creative!
ReplyDeleteHolaaaaaaa .. me ha encantado este tutorial y lo he compartido con mis amigas . .espero que te visiten y lo disfruten ... es DIVINO... mil gracias y besos
ReplyDeletehttp://mypatchworkantahkarana.blogspot.com.es/
This is so cool, I bet they all loved them! ~Diane
ReplyDeleteWhat stitch length/type did you use on these? It doesn't look like your average 2.5 mm straight stitch.
ReplyDeleteIt is free motion work. Put on darning foot, lower feed dogs. Stitch length will be determined by speed of machine & how fast you move fabric.
DeleteThat is beautiful, I love it, if you get blue painters tape and use that on your edges before you put the cloth in the printer, it will run through nicely and you wont have threads in your printer, I had my grandchildren color on some muslin and then I printed some pictures of them and made there mom and dad a quilt for one Christmas. I love your work, GOD bless and thank you for sharing,
ReplyDeleteWhat weight of thread did you use? It looks heavy.
ReplyDeleteSorry I can't answer that. I buy lots of thread at yard sales and second hand stores. I just used a thread that looked good and worked well with my machine and needle. It takes a bit of experimenting.
Delete